
Earlier we talked about How to Install WordPress on Bluehost, and if you are done with the WordPress installation, we move to the next article in this series. After Installation, next thing we need to do is set up WordPress blog for optimum use and security. There are many plugins, which will help you to make your blog secure, fast and add more functionalities. But, here we will look into some of the default changes and settings which we need to do to configure our first WordPress blog.
Set up WordPress blog in 5 minutes:
In this guide, I will add screenshots and explain every WordPress settings, that you need to configure. You can skip certain settings, depending upon your requirement for example, if you are creating a membership site or guest blogging WordPress blog, you can open user registration. So, lets get started with our WordPress setup guide and learn how to set up WordPress blog. Specially, for newbie this guide will help them to understand WordPress and help in understanding how to work with WordPress.
First thing first:
Once you install WordPress blog, you will get a default post “Hello World” and a default comment. Delete them and follow the rest of the tutorial:
Settings > General

This is where you will configure your Homepage name and tag line. This is very important, as by default this is what shows up in Google search. Email address will be your site admin Email address and this is where you will get all the Email notifications related to your site.
Now, for the security reasons, if you have a single authored blog. I suggest you to disable WordPress registration. Else, if you creating a membership site or implementing guest blogging opportunities, you can enable it and give it subscriber role by default. For allowing registered member to submit blog post, you can change the default registration permission to contributor. also, make sure you setup the timezone to your local time, this will make sure your scheduled post will go according to your timezone.
Settings > Writing
At this stage, we will set up WordPress settings related to writing. By default, WordPress adds a category “Uncategorized” which doesn’t look so ideal. Here you can change the default category to any other category. You can go to posts> Categories from left side pane, and add a new category. Come back, and change the WordPress default category to newly created category.
WordPress ping list:
One of the major difference between a static Website and a blog is ability to ping. By pinging search engine bots, our WordPress blog notifies the search engines about newly published blog post. You should update your ping list with all major ping services. You can get a list of WordPress ping services from here. Add all the ping services URL and click on update button. I also recommend you to use PushPress plugin to ping cloud ping servers.

Also under Settings > Writing you can enable or disable atom publishing and XML-RPC Services. If you are using any desktop blog editor like Windows live writer, you need to enable XML-RPC service.
Settings> Reading:
Now, at this WordPress set up page, you can configure many things like what should be your blog homepage be. For example, here at WPSutra, we are using custom home page and not a regular blog page. So, we changed the homepage to the custom page we designed. For a normal blog, you can let the setting be “Your latest posts” as shows in screenshot.

You can also configure the number of maximum blog posts to show on homepage and in feeds. Also, you can set if you want to publish full content or just partial content in the feed, I prefer to offer partial feeds(Summary), as I want more activity to happen on my site and also to avoid RSS theft.
Settings > Discussion

Here we configure comment related settings on our blog, and also one important setting which happen due to comment pagination. Here are settings which I usually use on my blogs: I’m writing down the settings which require to be on.
- Allow link notifications from other blogs (pingbacks and trackbacks)
- Enable threaded (nested) comments
- Anyone posts a comment
- A comment is held for moderation
- An administrator must always approve the comment
Avatar settings:
![]()
Now, if you are new to WordPress, I suggest you to go to Gravatar.com and create an account and upload your image for your Email address. And here, you can make changes like gravatar rating and default gravatar. If you wish to use a custom gravatar, you can refer to this guide.
Bonus tip: If you are paranoid about your site loading speed, you might like to disable the gravatar.
Settings > Media

Though you can skip setting up this part, but I usually suggest users to make come necessary changes to avoid lots of images files. By default, when you upload images in WordPress, it creates images in 3 different sizes. Here you can set sizes as 0*0 and keep only one desired size as enabled along with size.
Settings> Privacy:

This is the setting tab, where you configure if you want search engine like Google to show your blog in searches or not. I usually keep it off until I’m completely done with WordPress set up and ready to write my first post. If you are done with set up, select the option which says “Allow search engines to index this site.”
Permalink Settings:
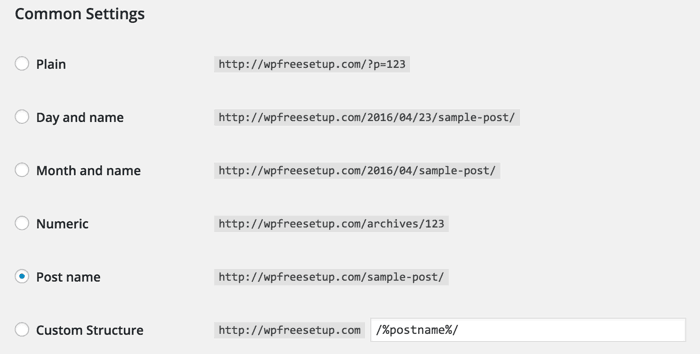
This is one of the initial setting, which every new WordPress user should change. Default WordPress permalink is not search engine friendly, and we should select one of those options which gives us maximum search engine advantage.
I prefer to keep it as Post name
First one is useful, when you are planning to submit your site on Google news, and the second one if simple and very effective for SEO. Go to Settings > Permalink and change your permalink to /%postname%/ and click on update. Make sure, you do this step before publishing any new blog post. You can get more info on WordPress permalink here. If you wish to change permalink for an existing blog, you should read: How to change WordPress permalink with 301 redirection.
With all these changes, you are done with set up of WordPress blog. Now, we need to make more changes like add plugins, submit the sitemap, Install theme, customize look and usability of our blog.
We will cover all such topics in coming days, but for now, you might like to subscribe to our Email updates, and if you find this tutorial useful, don’t forget to share it on Facebook and Twitter.
Here are a few hand-picked guides for you to read next:


Sir .In the word press beginner guide you have said to choose “Post Name” option, but here you are saying to choose “Custom Structure “.which one should I use? Please help me.Its an android blog.
@Tharunkumar
Both are same. They added post name option in later version. So now you can use Post name permalink structure.
Hey Harsh Agrawal,
It is really a useful post to me.
I am thanking you a lot.
Hello Harsh Sir, yesterday I was created one poll in facebook about hosting site. So, 70% bloggers select the Digital Ocean. So, can send help me out for the same. “How to setup Digital Ocean on WordPress?” Also, I wanted to know your suggestion about that.