WordPress is not only about creating simple journal blog, now a days people are using WordPress for offering services, selling E-commerce product or various commercial activities. It doesn’t matter for what purpose you are using WordPress for, one of the key-ingredient of making more sales with your site is by offering great customer support. This could be in the form of Pre-sales enquiry or after-sales support. There are many live-chat add ons and plugins for WordPress out there, but for an individual Skype is certainly the best free professional option out there.
Nowadays, it would be a pretty useful feature to integrate Skype with your blog – the most popular instant messaging and VoIP solution – into any site, especially small-business ones. It is very likely that upon visiting a site that offers some services, people might want to inquire further. Or let’s say that they have questions to ask before purchasing any of your offerings. In such a case, having Skype integrated, and displaying a ‘Skype status’ icon plus message, anywhere on your site, would make contacting you rather convenient! Then, visitors will be only a click away from sending a message, or starting a chat. This article will explain how easily you can get all these up and running in WordPress.
Skype Online Status plugin for WordPress Blog:
Here, the very first step toward showing your Skype ‘status’ would be to use a plugin called, Skype Online Status. Most probably, this is one of the best you can find in the WordPress plugin repository. So, to start with, install this plugin, and then activate it. Once done, go to the Settings, find the item named ‘Skype Status’, and click to open the corresponding options page.
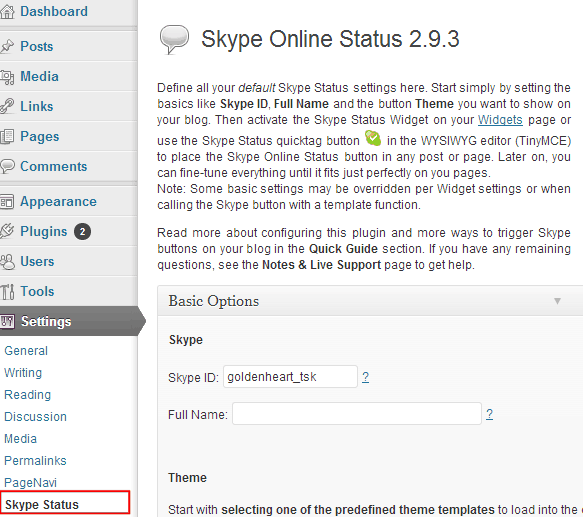
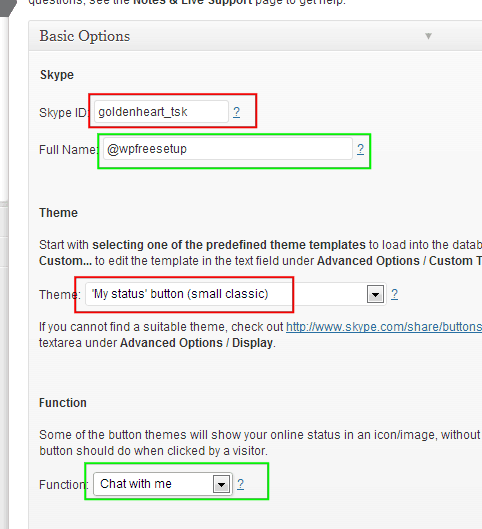
Now we need to customize the plugin’s configuration, as well as visual details. On the options page, under ‘Basic Options’, you will notice the most initial ones that are to be edited. So, first enter the desired Skype ID you would like people connect to. It is also possible to enter multiple IDs, separated by semicolons, or a phone number preceded by country code, for enabling conferencing or calling feature.
I would recommend you to create a separate Skype profile for offering support, and keep it online most of the time, this way you may get few messages when you not on your desk, but you can always revert back and make a lost sale into converted sale.
Next, insert a suitable phrase in the Full Name field; it will be used as a link anchor, an image alt, and so on. Thereafter, select a Theme from the given dropdown list, which shows an extensive set for all kind of requirements. Finally, pick up a Function from the other list, which is necessary only if you have selected any of the ‘button’ themes! As for example, we have chosen the – “My Status” button (small classic) – theme, and assigned the – Chat with me – function to it. Then, click the ‘save changes’ button.
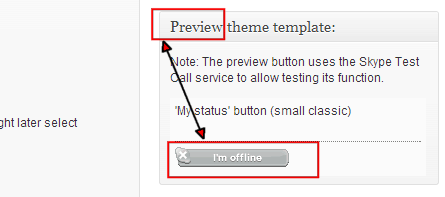
Remember that the ‘Preview theme template’, on your right, shows the outcome of all the changes made, including how the button looks, etc. However, do not forget to click the save button after making changes to the options, or you won’t be able to preview them!
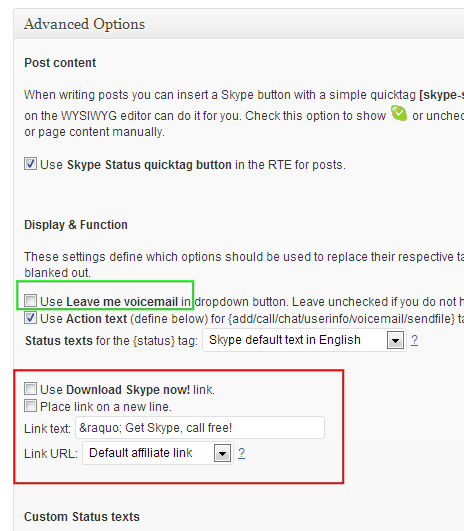
So far, all the needed options have been configured. There are a few more things to do yet, and one of them is modifying the ‘Advanced Options’. You can leave most of the options here to their default setting. Just uncheck the last two options mentioned under ‘Display & Function’, because these are – affiliate links – the undesirable ones! And if you do not intend to provide any calling function, then it would be better to uncheck the – leave me voicemail – option.
All done! Only thing that is left to do is integrating or displaying the Skype ‘status’ somewhere on your site. Suppose you want it to appear on either left or right sidebar region.
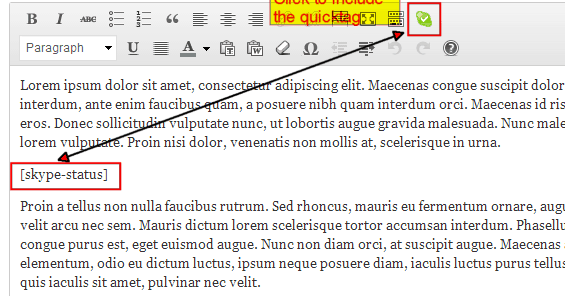
For this, the plugin provides a widget; just drag it to any of your defined widget areas, and configure the given options if really needed (Appearance > Widgets > Skype Status). Or, if you want to show it within your post content, you should include the – Skype status ‘quicktag’ – the plugin has built-in support for. You can easily do so by clicking on the corresponding quicktag button, visible on the post-editor menu.
As you can see here, Skype Online Status is really a very nice plugin, which you can use to display your ‘availability’ status on sites.
It gives you even more features and flexible options than the ones mentioned here. Also, it comes with a pre-built user manual. You can download the plugin from official repo over here.
Here, we hope that this article will help you displaying your Skype ‘status’ as intended on your WordPress blog. Without any doubt, adding such a feature to your site will be worthwhile, both for you and your visitors, in more than one way.
If you are using any other live chat plugin on your WordPress blog, do let me know. If this tutorial helped you to integrate Skype on your WordPress blog, feel free to share it.


Great, detailed tutorial. Integrating Skype into my WP site is really a great idea, since people who needs to know something gets instant answers when I am online. Makes interaction fast and easy.