Feeds are very useful and important part of any blog, as it will help your readers to keep a track of latest update on your blog using their feed readers. By default WordPress Blog, feed URL is http://domain.com/feed but it’s not compatible with all the feed reader and the best way to make your Blog feed compatible to burn and redirect using any 3rd party feed readers. There are many free and premium feed burning services, and the best is Feedburner, which is not owned by Google. In this guide, I will be talking about how you can get started with burning your blog feed using Feedburner. Though, this guide is written especially for WordPress blogs, but if you own any other platform that offers default feed, you can burn them too using Feedburner.
Creating WordPress Blog feed using Feedburner
You need to have a Google account to login to Feedburner, or you can create a Free account. Simply go to Feedburner homepage and log in using your Google account. Once you are at Feed Burner dashboard, you will see an option to Burn a feed right away, add your blog URL. Yes, your blog need to have at least one blog post to discover the feeds, else it will show error. So make sure you follow my first time WordPress setup guide and set your permalink right, and start the process.
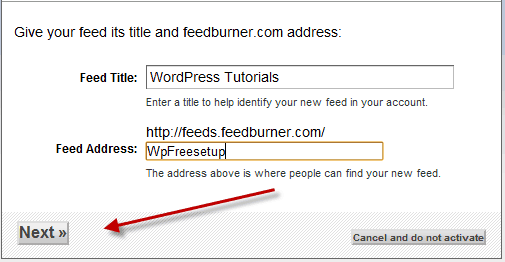
Click on next after adding your Blog URL or feed URL, and it will give you the option to set title and feed address. For Feed title, It’s best to use a title which increases CTR, for example my blog name is WPSutra, which is good for SEO, but I would keep it WordPress tutorials or how to use WordPress, as it will make more sense for Subscribers.
Though to maintain the consistency in branding, I will keep the feed URL as WPSutra only.
Click on next and that’s it. You are ready with your blog feeds and here is my final Feed URL: http://feeds.feedburner.com/WPSutra
Though, there are additional settings that you can configure to make most out of it.
Extra settings for Feedburner Feeds:
Here I’m quickly going to activate few services offered by Feedburner, which will help you to make most out of newly created WordPress blog feed. Activating this services, will help you to spice up your blog feed.
Activate following services under Optimize settings:
- Browser Friendly: You can set your Feed theme and add more subscription options.
- Smartfeed: Make your feed compatible with almost all the feed readers.
- FeedFlare: Add options like Email, bookmark directly in your blog feed.
Activate following FeedBurner services under Publicize settings:
- Email Subscription: Offer Email subscription feature. Activate it and you can grab Email subscription code. You can configure various options for Email branding here.
- Feedcount: If you want to show a total number of feed subscriber on your blog feed, activate this service.
There are many more options available and depending upon your requirement, you can enable them. That’s it and congratulations, you have just created your WordPress Blog feed using Feedburner.
In next tutorial, I will be talking about setting up redirection and other things, which you can do to spice up your blog feeds. For now, subscribe to my Email newsletter for the latest update & if you find this tutorial useful, do share it on Facebook and Twitter.


Hello Harsh,
Thanks for making complex things simpler.
I got it google Feedburner done by somebody else for my blog http://www.learntourism.com/blog
However after reading it here i can do it now.
Thanks
Pankaj Kumar
Good breakdown! Using Feedburner is also better for SEO because your links are now hosted on feedburner’s public web servers (backlinks).